

The bathroom sink installation is an easy DIY job and all you need to have is the willingness to do it with a few primary home improvement skills and tools. It does not matter whether you are moving to a new place and installing a brand-new bathroom sink or replacing the old one. Depending on the variation of the style and shape, the installation process of the sinks will be different, yet the basic steps of installation are same in all types of sinks. Here we will discuss this at length. If you follow a few steps carefully you can install a new bathroom basin securely.
Here is how to assemble and fit your new sink into place
Before you start installing a bathroom sink, acquire a few common tools for the job. Additionally, you require some of the components to match your valves already installed in your plumbing system. The tools you require are -Plumbers’ wrenches, Silicone caulking, either pipe wrench or slip-joint pliers, Basin wrench, Set of plumbing sockets etc.


credit image
http://img-aws.ehowcdn.com
- First, switch off the water supply valves usually found in the down below the bathroom basin. If you do not find them there then you have to power off the main water supply. This is in the basement near the water meter. Just to teat if water is closed properly you turn on to see both hot and cold-water tapes. When you are sure then remove the old bathroom sink. Do remember to cut the supply and drain lines from the faucet. A locking plier will help you do that. You might see a little bit of water pouring from the tape while you are doing this, which is absolutely normal.
- Now find out the huge nut which works as a connecting point between the bathroom basin and the drain and then cut it. It will be found either on the wall or on the floor. First, unscrew the nut with a locking plier. Take a putty knife and by way of loosening the caulk, remove the old bathroom sink.
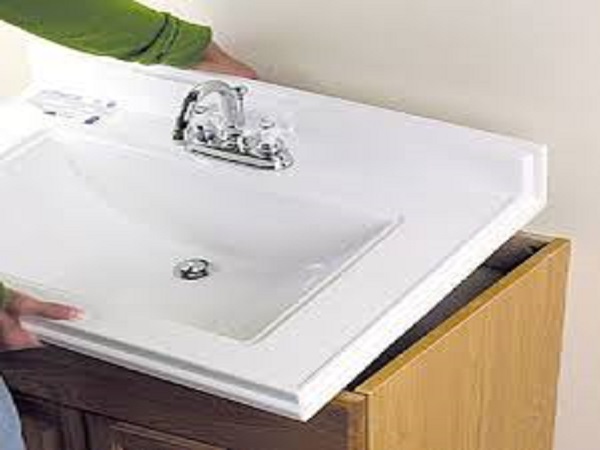
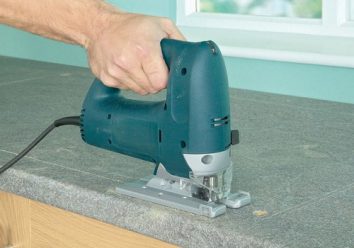
- Now take a measurement of the new bathroom basin to see that it fits the space of the old sink. Looking at the marks given on the sink you adjust it. It includes the location of the faucet holes and a cut out for the sink. You might need to do some trimming or other adjustments if the bathroom sink size does not fit into the place. If it is an under-construction house, you will face this problem.
- the modern-day bathroom basin comes with clips and screws which helps to keep it in place. Get other materials like a drain and tailpiece if they are not included in the packet. The supply lines for the faucet should match with the faucet and valves under the bathroom sink to function.
Installing the new bathroom sink
Now put the new bathroom basin in place and caulk it. Use a thin bead of silicone, a type of sealing in the bottom lip of the sink and put it into the hole. Applying silicon can be messy, so apply it smoothly, remove any remains of it. You might need to caulk in various places depending on the style and opening of the bathroom sink where it connects to the plumbing lines.
If you are installing an undermount bathroom basin, have someone to hold the sink in place and you use a bead of silicone under it, and install the connecting clips first that comes with the sink. If it is a granite structure you are installing it, then you have to do some amount of drilling as well.
credit image
https://www.bricolage-facile.net
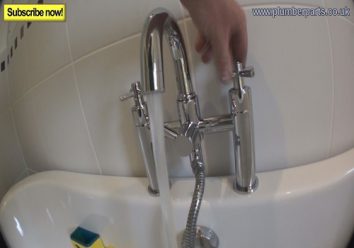
Fastened the bathroom sink with clips. The design of the clips may vary according to the style and opening of the sink. Now adjust the tap. Some of the bathroom taps include a rubber gasket around its base which you can screw on easily. The next step demands you to reach the underneath structure of the tap and fix the lock nuts which comes with the installation kit.
According to the structure and design of the faucet, sometimes the tap is installed before the bathroom basin. You must ensure that the tap is adjusted in parallel to the location of the sink. Do some prior measurement to avoid any mismatch.


credit image
http://www.atticmag.com
The next step is the installing of the tailpiece and drain kit. By way of dropping the tailpiece through the bathroom sink and then screwing the nuts from under the sink. To seal the locknuts, you can use plumbers’ putty or silicone.
One important thing to remember is that the water lines must match the new fixture. If it does not match the lines, then you should get additional lines.
Now switch on the water supply lines and screw them with the joints of the new tap. The next step is to adjust the pop-ups, this is something that enables you to open and close the bathroom basin drain. Tighten the tap in proper amounts.
credit image
https://i.ytimg.com
You may not always need a washer. By way of sliding out the nut, you can trap the ball in the tailpiece. Tighten the tap in proper amounts. Once again you must use silicone caulk to protect your connections. Use it in the places around the top of the bathroom sink, and places where the basin of the sink meets the wall. If you see any gap just fill it with caulk.
Final step in bathroom sink installation
Leave the fittings to dry for at least 24 hours. After that, you can switch on the water and inspect any leakage. If you see any leakage, then try sealing them out with silicon. Sometimes the defect may be in the washer, so try replacing it.